


For the winter warriors, who never let a little Arctic blast stop you from keeping busy on the weekends… We salute you! Which is why we searched the world wide web to find inspiring winter projects you can accomplish alone or with the family over one weekend.
Backyard/Deck Fire Pit
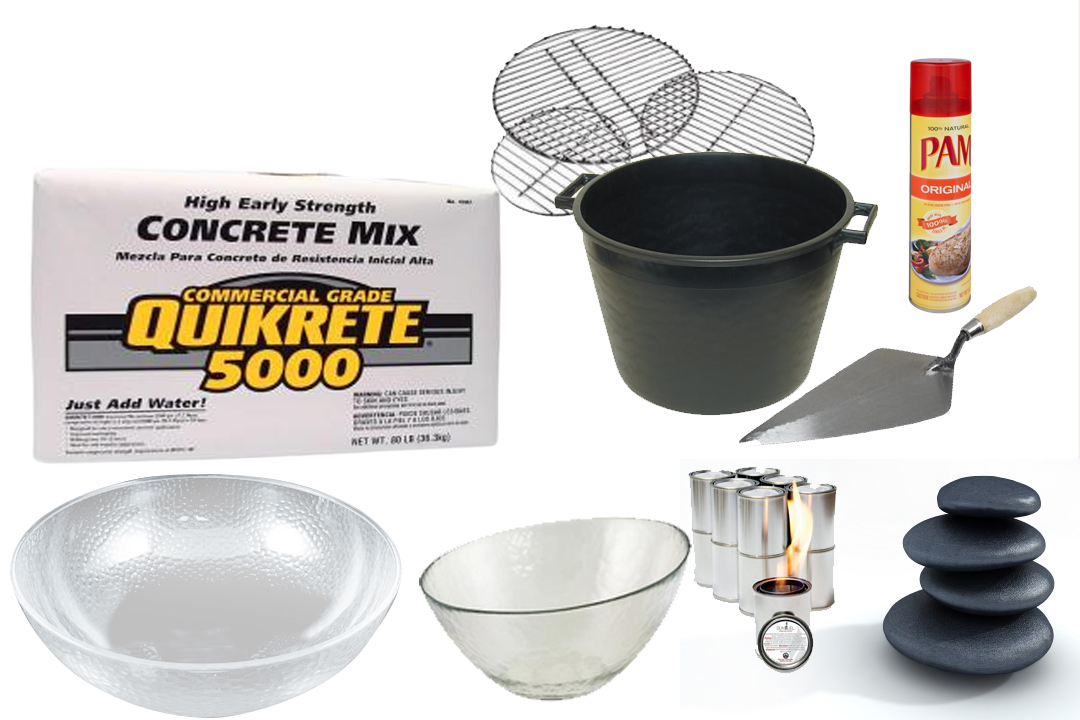
Inspired From Man Made DIY – This is a fantastic weekend project if you enjoy entertaining outdoors year round.
 One bag of Quickrete High Strength Concrete Mix
 - a deep bucket
- masonry trowel
- non-stick cooking spray
- a large plastic serving bowl (or plastic planter)
- a second plastic serving bowl or planter that’s 3” inches smaller in diameter
- Fire Safe Rocks
- Replacement Grill Grate about a half inch smaller than the inner molding
- Gel Fuel Canisters
- Sponge
- Safety goggles, mask and gloves
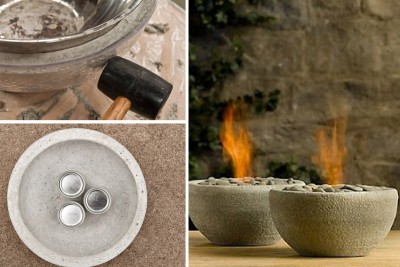 Spray a layer of non-stick cooking spray over the inside of the bigger bowl/planter and a layer on the outside of the smaller bowl/planter. Mix a third of the bag of concrete in the bucket, adding water a little at a time until the mix is thick like cookie batter. Pour enough concrete into the larger bowl/planter to coat the bottom up to where the bowl/planter begins to curve. Immediately push the smaller bowl planter down into the concrete, gently pressing to smooth out the concrete. Use the trowel to add the concrete mix up and around the large bowl/planter. You can take the inner bowl/planter in and out a couple of times to check the cement for even thickness. Just be certain to keep the inner bowl/planter in the center or consistent with the first placement. Once the outer bowl/planter is full, place the decorative rocks inside the inner bowl/planter to weigh it down while the cement dries. After the concrete has cured, use a rubber mallet to gently tap it free from the mold. Remove the inner bowl first, then repeat to free the larger/outer bowl. Dampen a sponge use in place of sanding pad/paper to smooth the top lip and body of the cement fire pit. Center a few gel fuel canisters at the bottom of the inside of the pit. Place the grill grate on top of the fuel canisters and cover the grate with rocks. When you’re ready to entertain, light the gel fuel canisters with a long neck grill lighter and enjoy. Using the gel fuel makes it easy to snuff out when you’re ready to end the evening and it’s even safe to make S’mores on cold winter nights!
Tip from Man Made DIY: use something with a motor to vibrate the bowl to remove any air bubbles inside the mold before it cures. (reciprocating saw without a blade, a powered sander, an oscillating or rotary tool, immersion blender etc.)
Indoor Camp Out
Turn the cold winter weekends into an adventure, by setting up camp inside. Use the broomstick handles, cotton rope and bed sheets to build tents. Make a Faux wood fire and Heat real S’mores with a few household items, a few items from Mother Nature and a little imagination!
Personal Indoor S’mores Pot
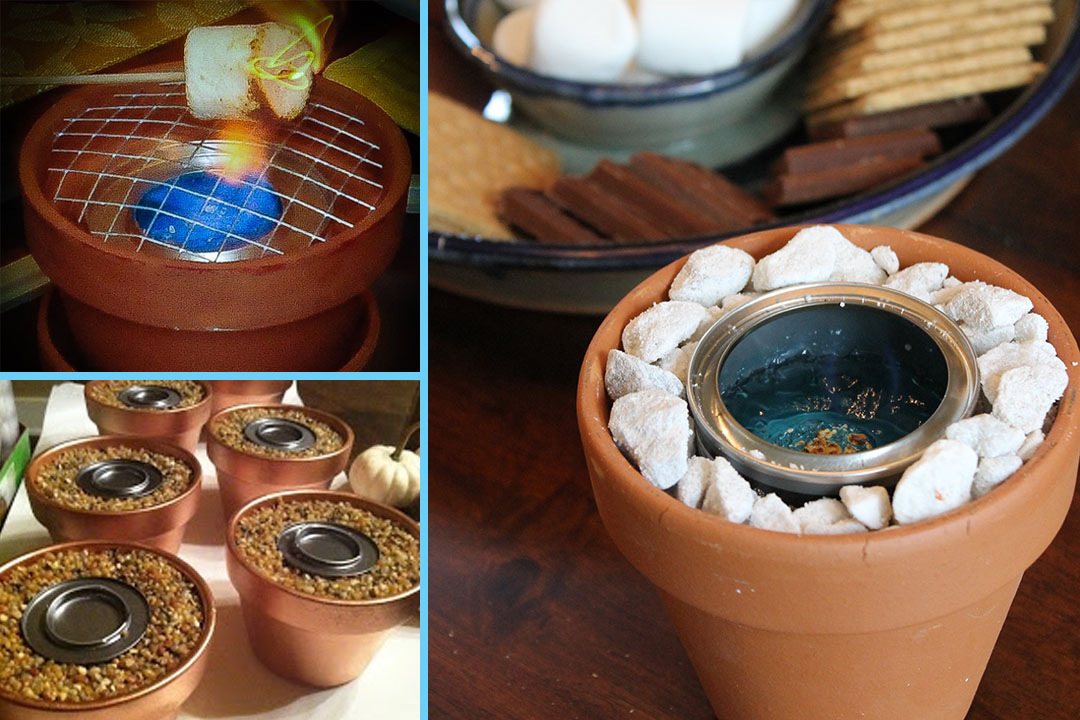 Your kids will crown you the coolest parents on the block with this little S’mores machine. – Inspired by Twelfth Avenue
- A small terracotta pot
- A sterno can (gel fuel cans used for heating catering trays)
- clean pebbles or river stones
Fill the terracotta pot to the halfway mark with pebbles. Center the serno inside the terracotta pot. Surround the sterno with more rocks. You don’t want to cover the sterno top. The pebbles should be at the same height as the edges of the sterno. Optional Safety top for kids: If you have younger kids, cut out a circle of chicken wire, that fits the brim of the terracotta pot. Break out the marshmallows, graham crackers and chocolate squares and get cookin!
Faux Campfire
- Twigs and branches
- Large Rocks or broken bricks
- Tissue Paper – Yellow, Orange & Red
- LED flameless Candles or String Lights
- Circular Mirror or Cardboard wrapped in Aluminum foil
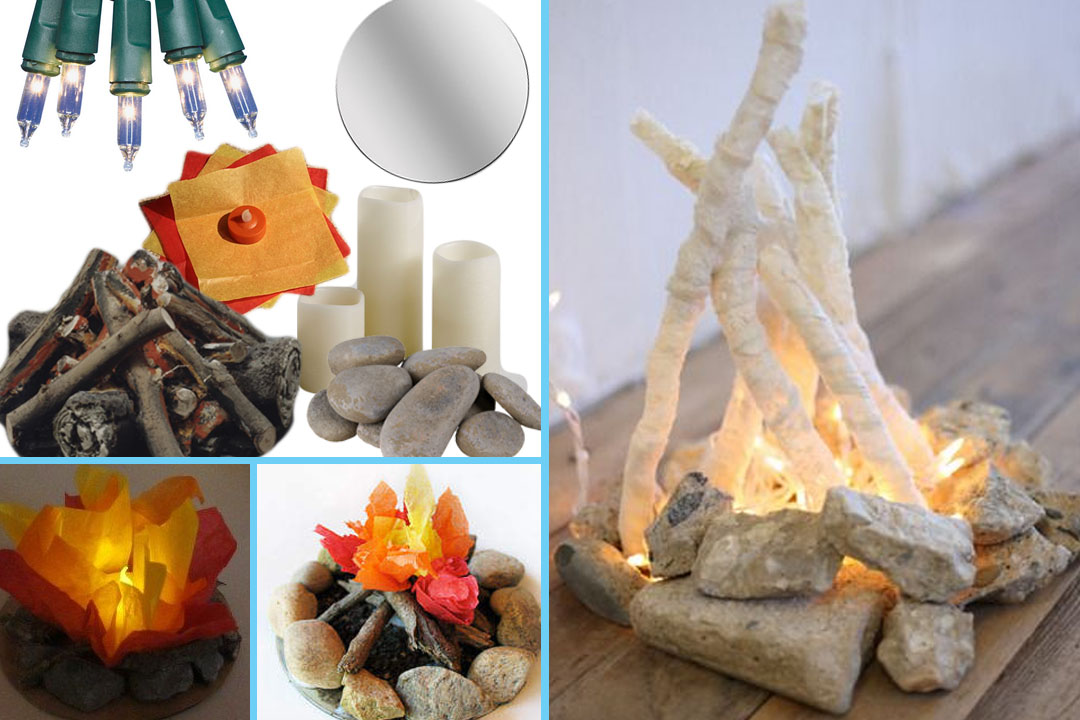
This is an easy and fun project to get the kids involved with. Gather a few branches lying around outside and some large rocks. Broken bricks will work will for this as well. Place a circular mirror on the floor where you want to create the faux campfire. (A cardboard circle wrapped in aluminum foil will work well here if you can’t find a mirror around the house). Form a circle around the edges of the mirror with the rocks. Next place a few sheets red, orange and yellow tissue paper in the center of the rocks. Place the LED Flameless Candle in the center of the circle. Note: If using flameless tea lights, wrap three or four of them in tissue paper and arrange them in the center of the circle. Finally, stack the twigs, teepee style. Note: Tie the top of the teepee with some twine, if you want to be sure the faux campfire, doesn’t fall down. Finally, Shut off the lights and tell some ghost stories next to the campfire!